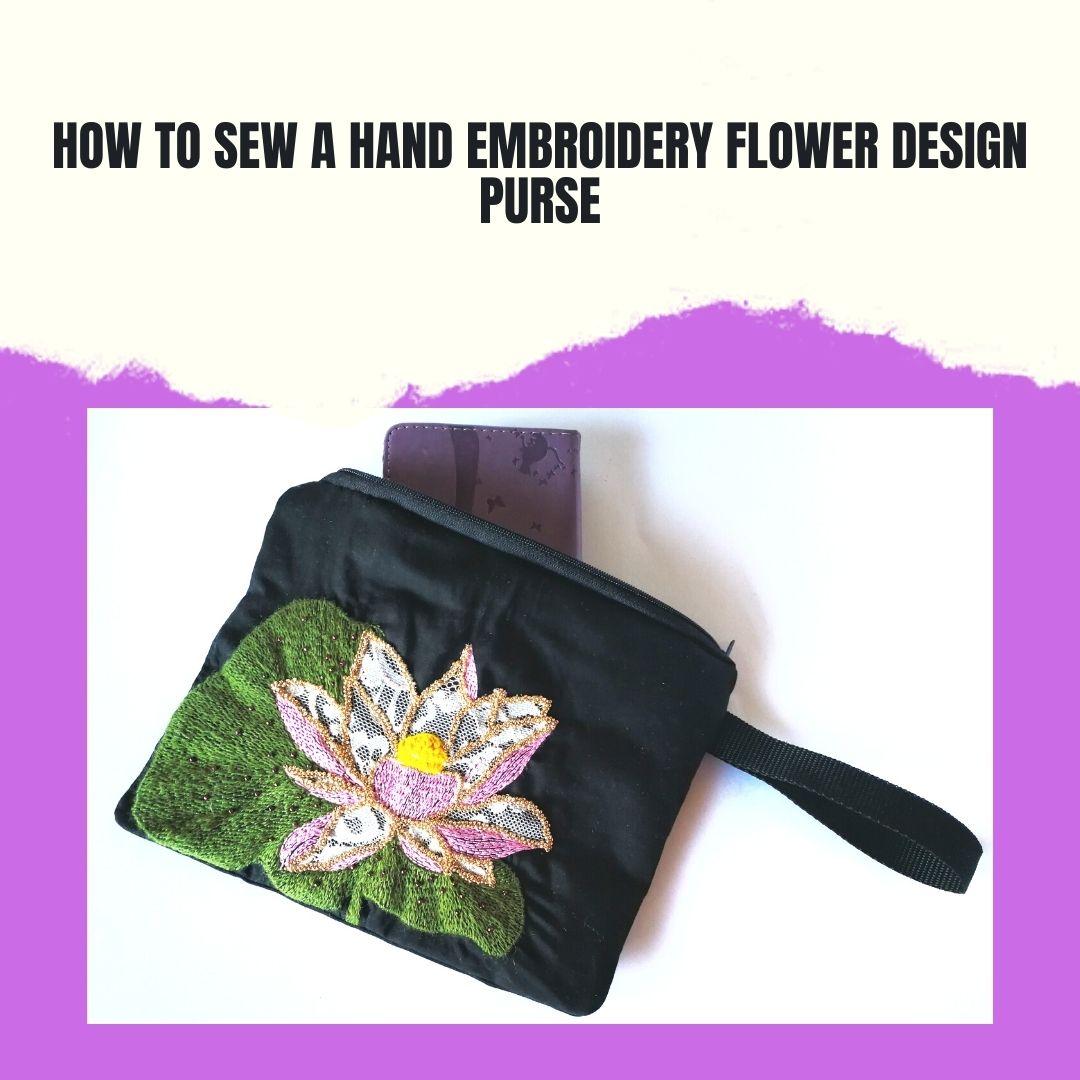
Did you want to make for yourself Hand Embroidery Flower Design Purse and you didn’t know how to start the creative process from scratch? You are in the right place. I have been thinking about creating a small purse for myself for some time now and I really enjoyed the time that it took for the idea to grow inside me. Now I want to share my process as a step-by-step tutorial with you for free.
My small purse will have to fit in with my family life, so I will share with you my progress each week. My goal is to improve my skills with satin stitch or as some call it – thread painting with long and short stitch.
Week 1: Gather your materials & look for your dream flower design
I have made my purchase of materials and I bought the following :
- zipper (25 cm),
- interlining (24 cm / 20 cm),
- outside fabric (24 cm / 20 cm),
- inside fabric (24 cm / 20 cm),
- fabric for a handle (26 cm / 6 cm).
IMPORTANT: you need to wash and iron your fabric before you sew it – if you don’t you may get distortions in the fabric after the first wash.
TIP for SIZE of Purse: I measured my old purse and adjusted the size for a new purse that it will be big enough for my phone, wallet & face mask.
For the embroidery you will need:
- pattern/design (I draw my own design size),
- transfer pen,
- needle,
- scissors,
- threads (DMC or any other),
- hoop or frame (I used my frame, but it could be done with hoop too).
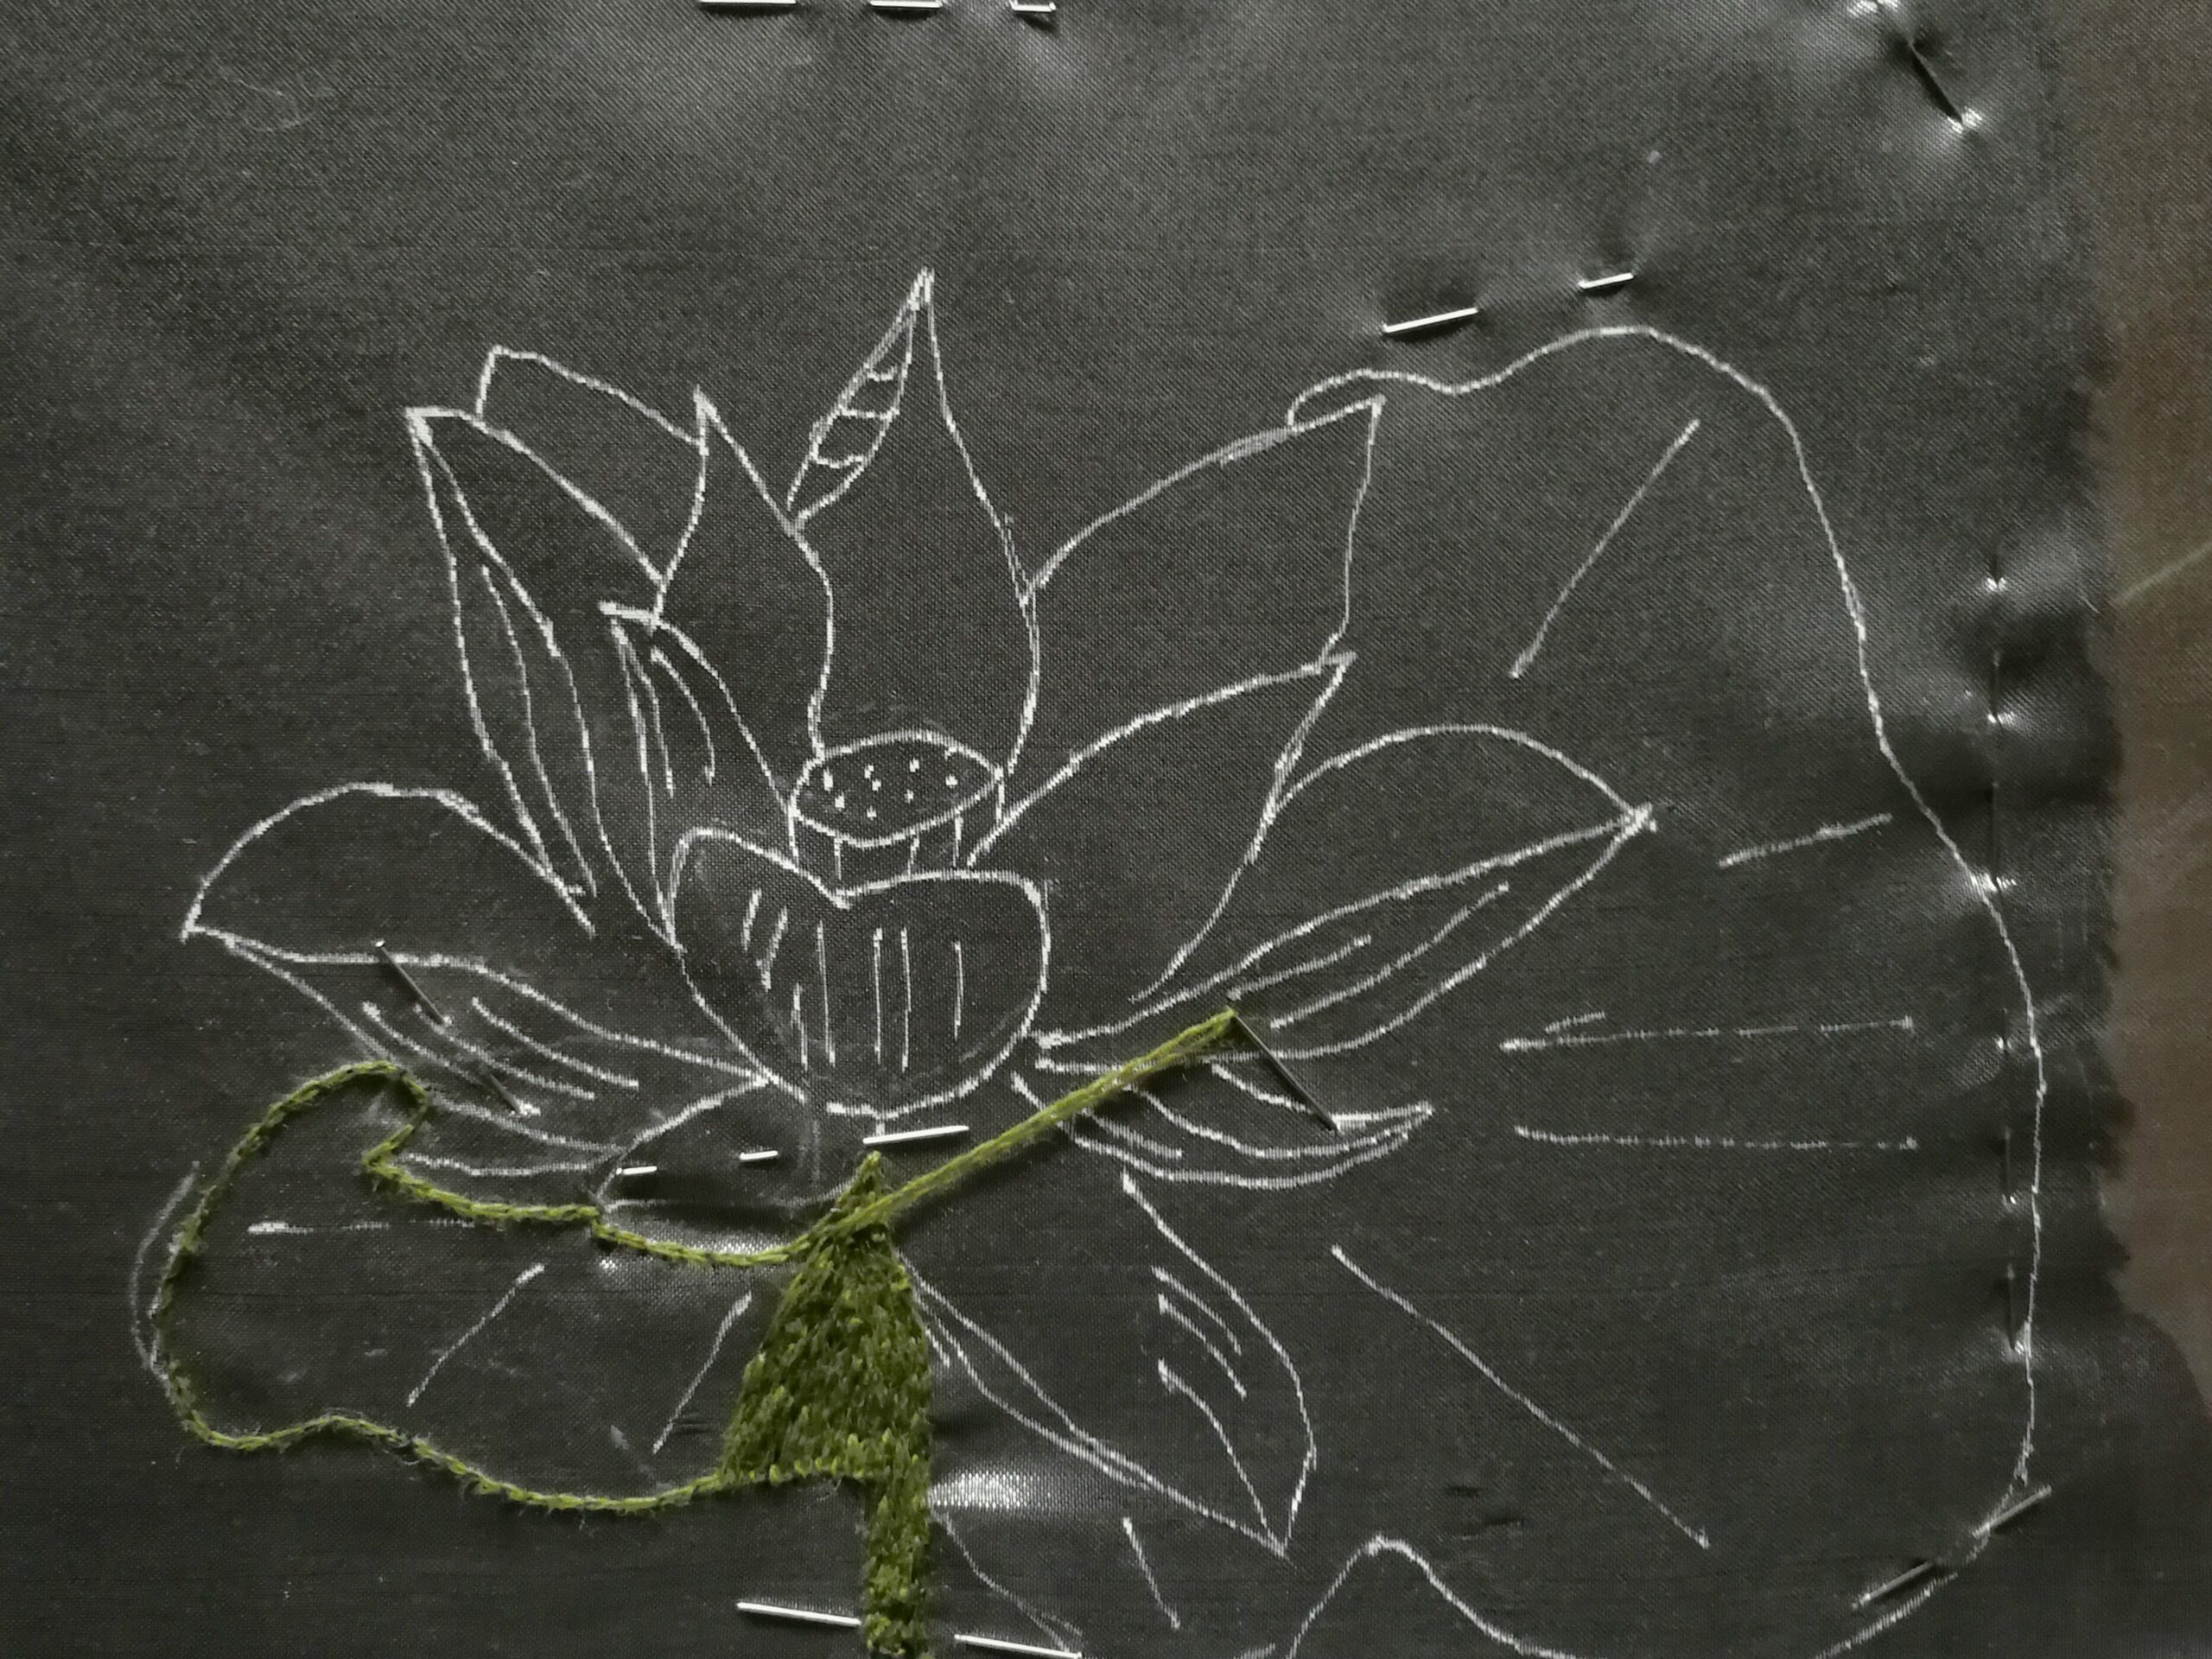
My lotus inspiration flower pattern:
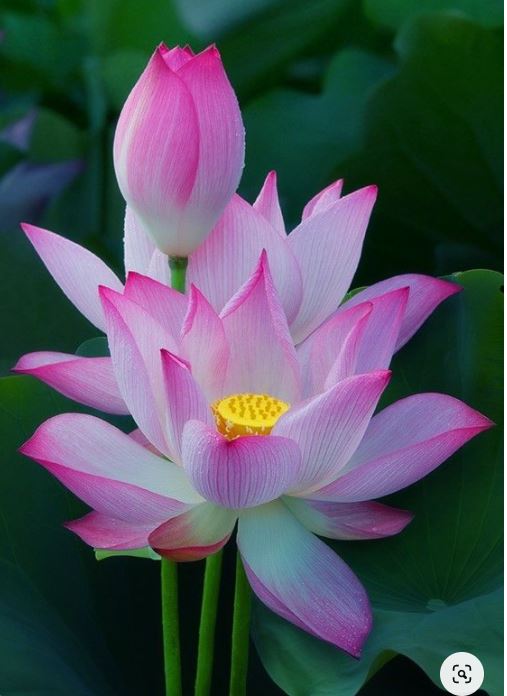
Here is a beautiful example of the satin stitch needle technique that I wish to improve during next weeks:
Here is a very nice YouTube video – here you can see how satin stitch can also be done with Luneville hook. I prefer to use a hook when I work on large embroidery areas because it is quicker to cover large areas and also it is easier to correct the mistakes (in case you make them).
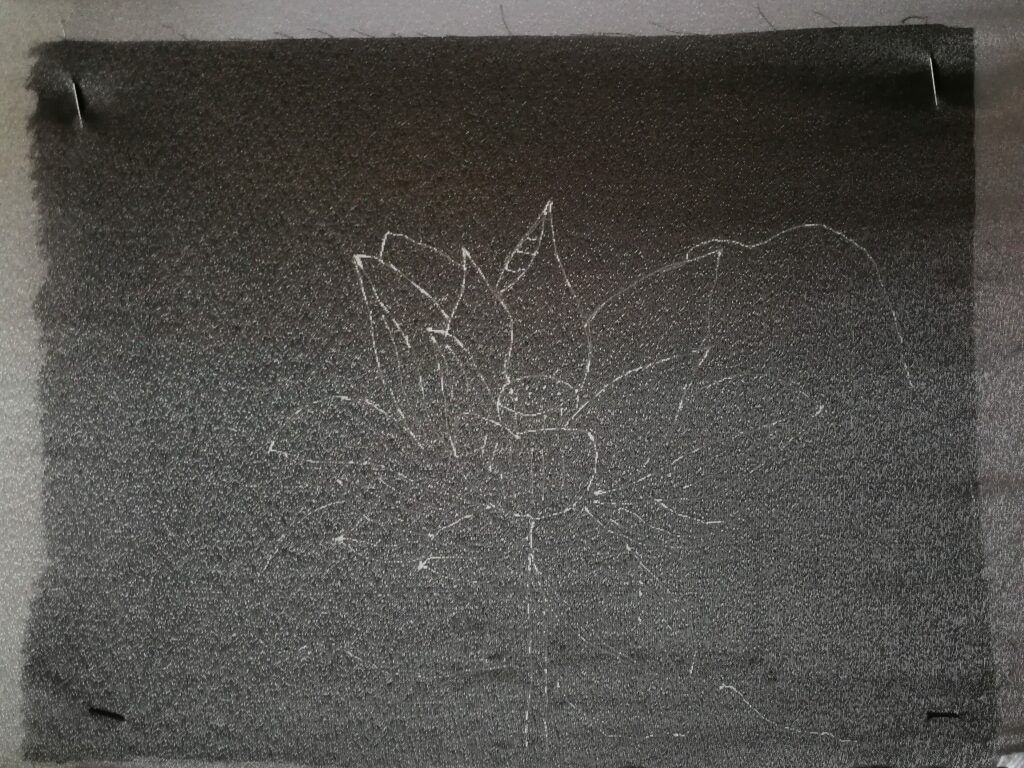
Week 2: Transfer your pattern, choose your threads & start working on a Lotus leave
I have put organza onto my frame – I decided to do part of my embroidery with a Luneville hook. I have transferred the pattern to organza, using a white roller.
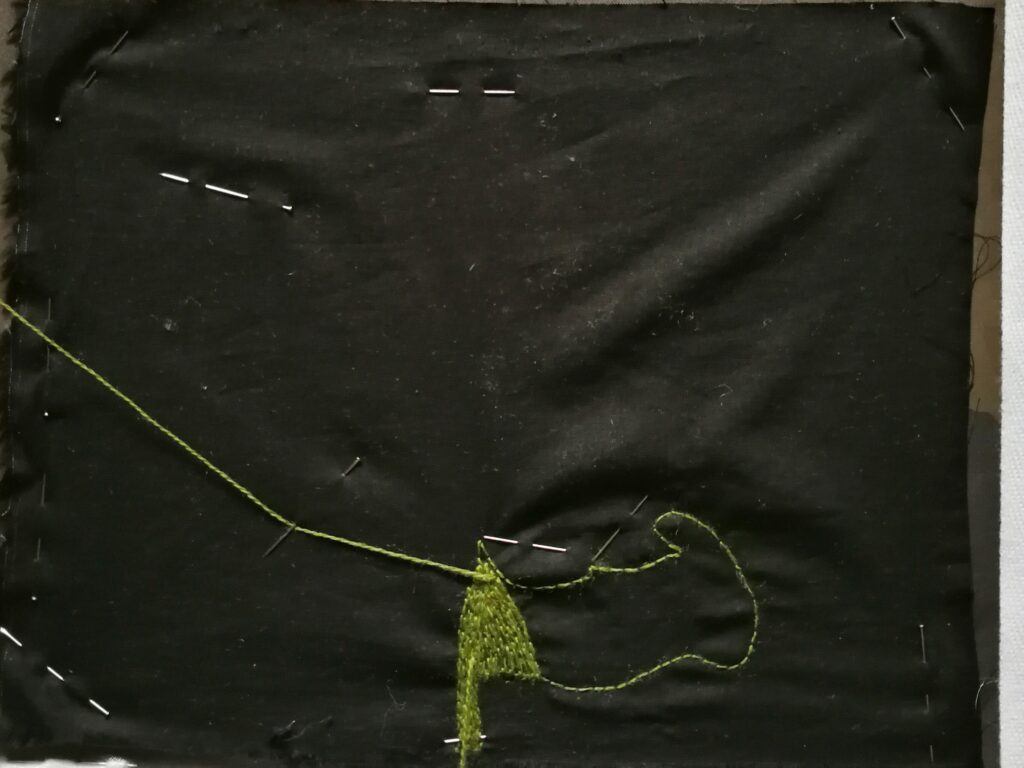
I have decided to first start working on Lotus leave. It is a very big leave and that is why I have chosen to embroider it with satin stitch in Luneville technique.
Here is my front side …
… and here is my backside.
Week 3: Still working on a Lotus leave
I am still working on my Lotus leave – it is a very big leave, but with the Luneville technique my progress is much faster than with the needle technique.
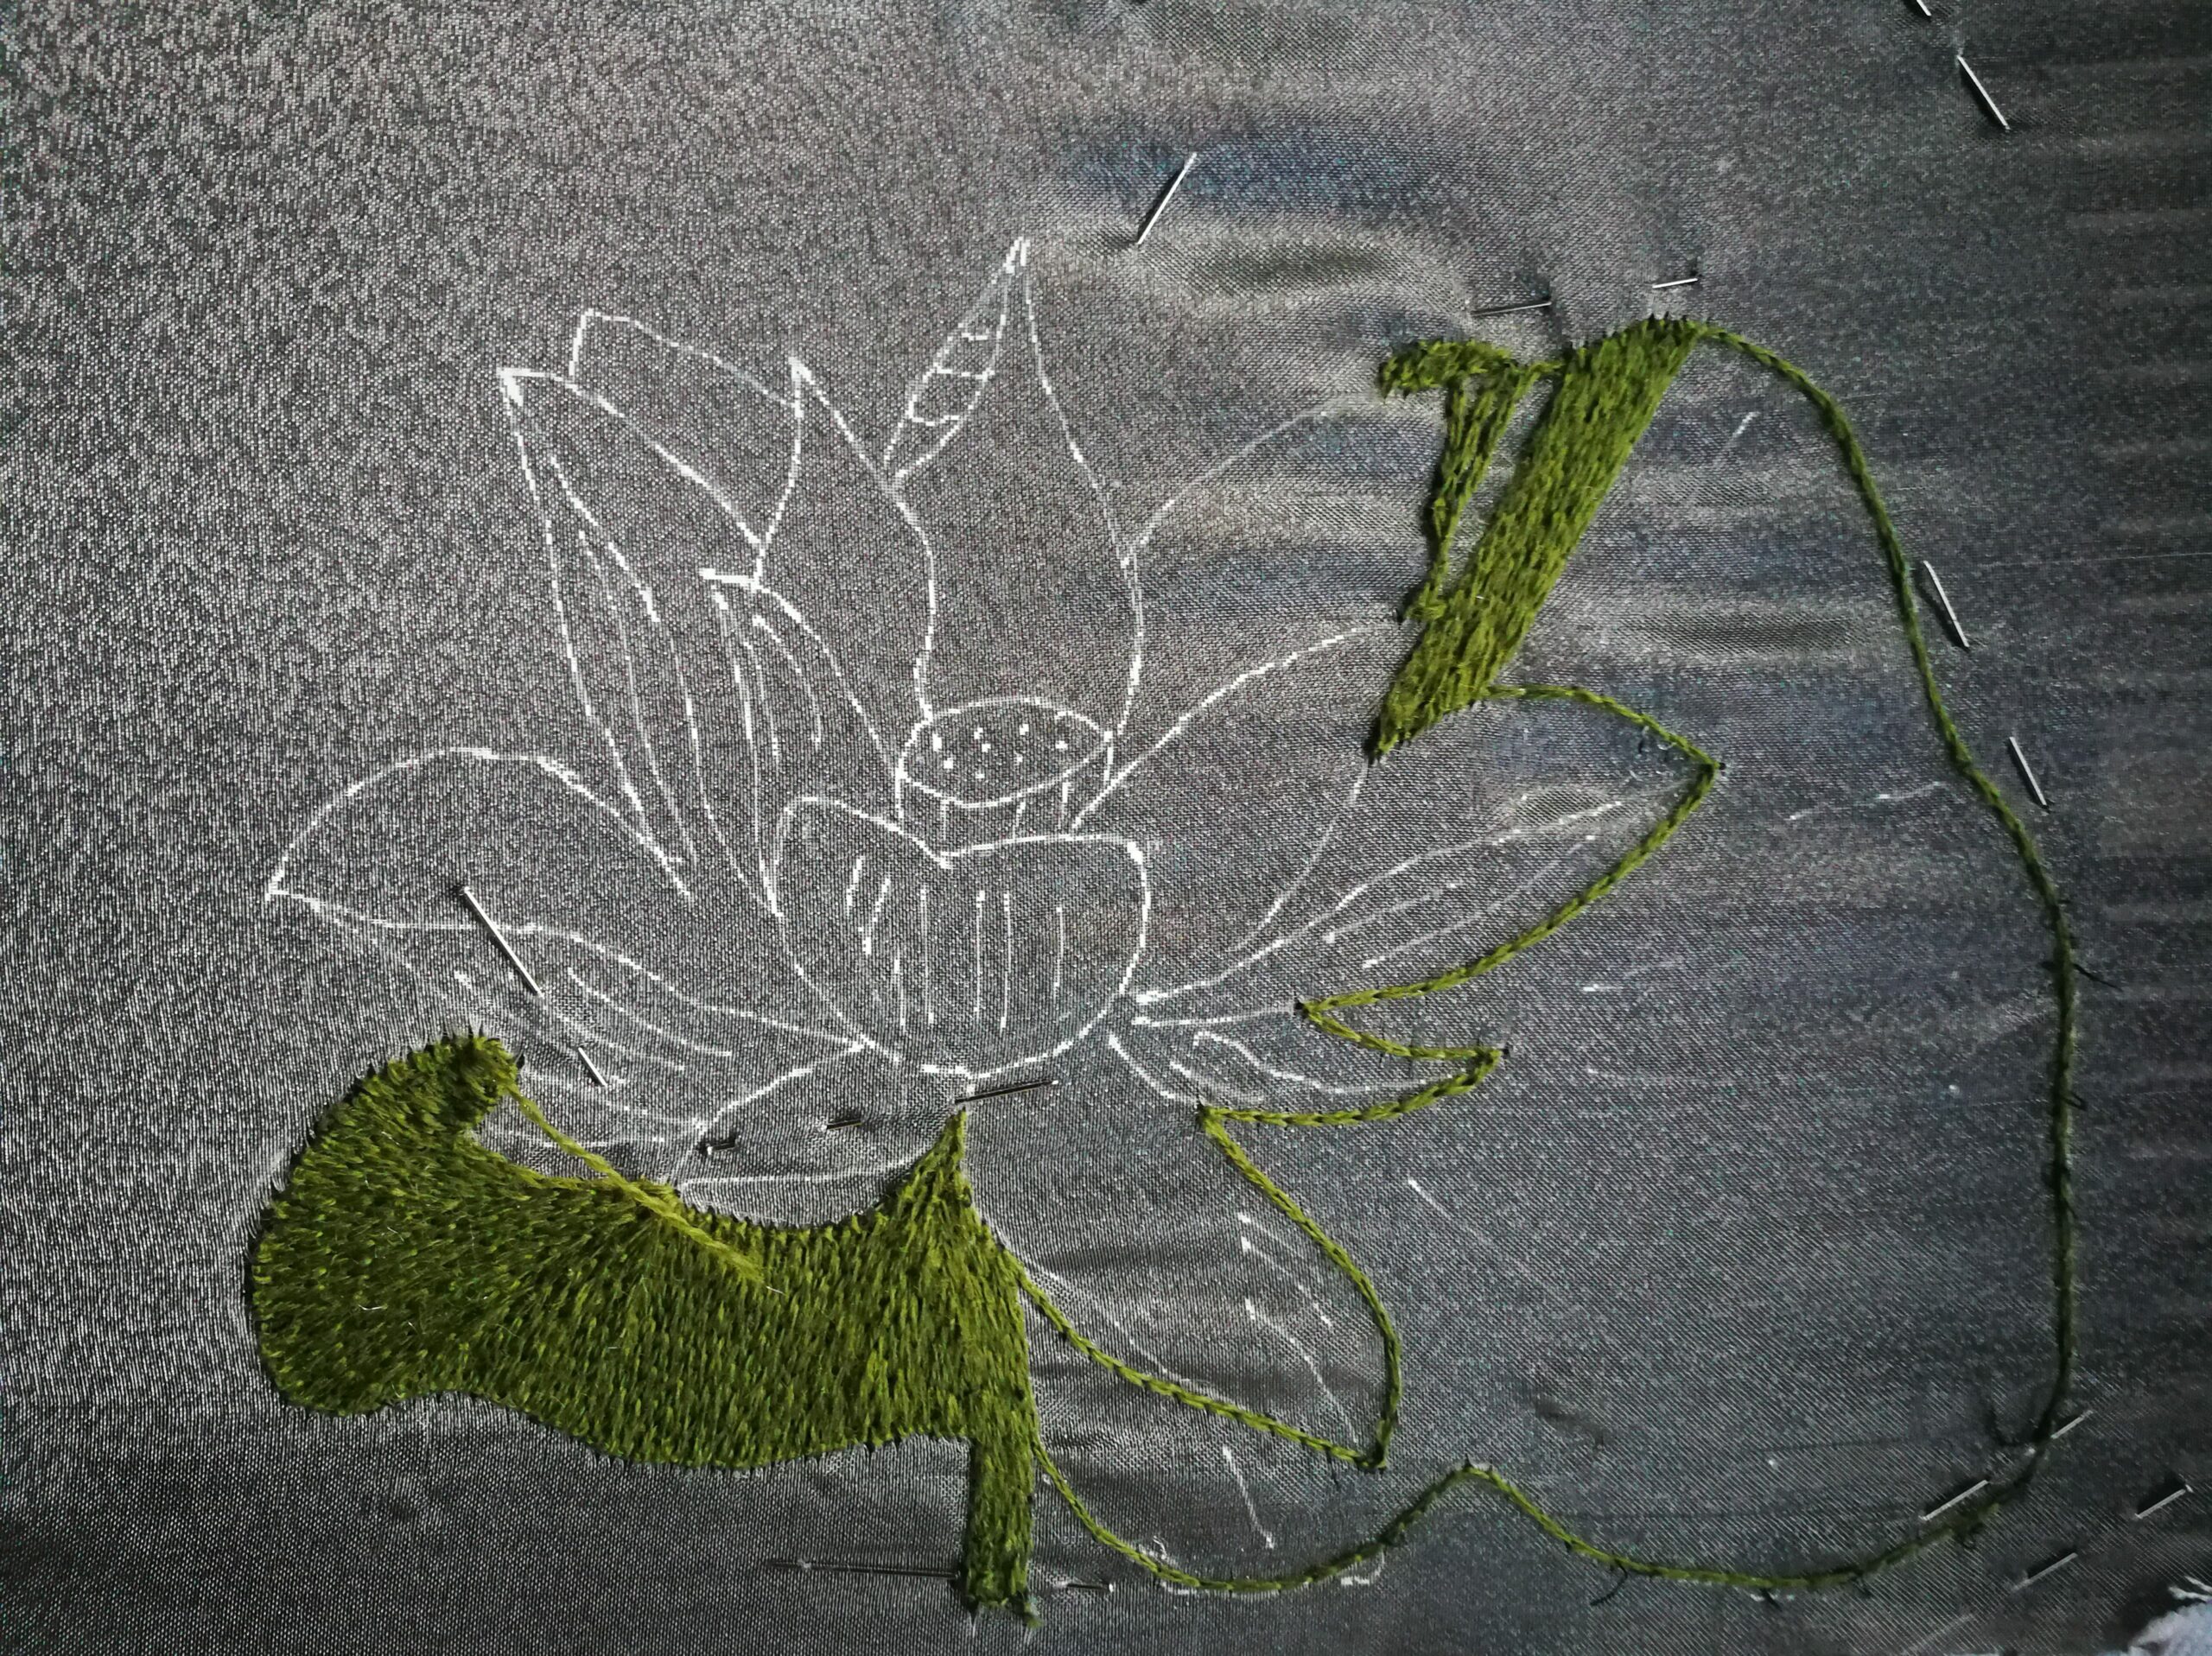
Week 4: Start working on Lotus flower petals
This week I have started working on Lotus flowers. I have decided to use the same technique. The outside of flower petals is shaded, So I have selected a 6 strand thread Ljubica, no. 538. If you will embroider with the Luneville technique, I recommend that you cut a length that you are comfortable working with.
PRO TIP1: I use only 2 strands of 6 strand thread for luneville embroidery.
PRO TIP:2 If you will work with the needle, then you can use 6 strands or 4 strands. The number of strands that you decide to you, allows you to add more texture to your Lotus flower (6 strands) or make a more delicate look (4 strands.)

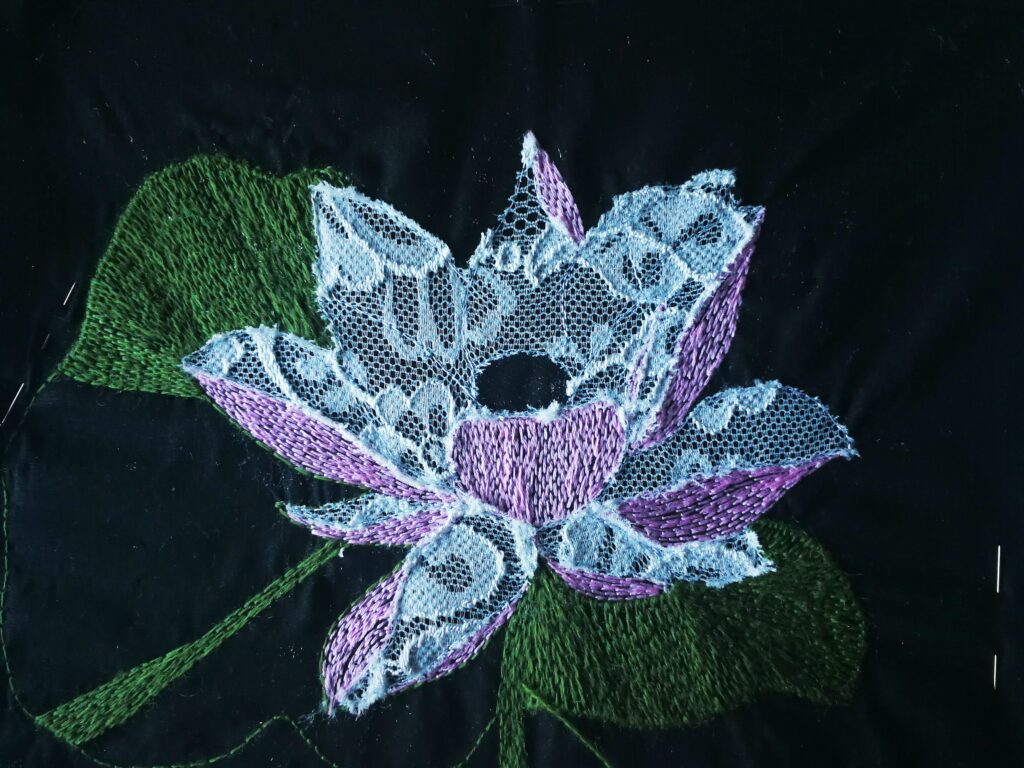
Week 5: I have added lace to decorate Lotus flower petals
I have finished my pink leaves on my lotus. I really enjoyed working on them. I didn’t quite know how I will proceed – the answer came quite unexpectedly. I was looking for materials for my next project that’s starts on 31. January – THE100DAYPROJECT, when I found beautiful lace inside my craft drawer. I have carefully attached it over my embroidery canvas and started working around leaves with small stitches – I used my Luneville hook – but you can get the same result with the needle.

PRO TIP 1: Use sharp scissors for cutting lace.
PRO TIP 2: Have good lighting when you are doing this – the best light you can have is natural daylight. Turn around the piece if necessary
PRO TIP 3: TAKE YOUR TIME! seriously – do not hurry. If you are in a hurry, do this step another time.
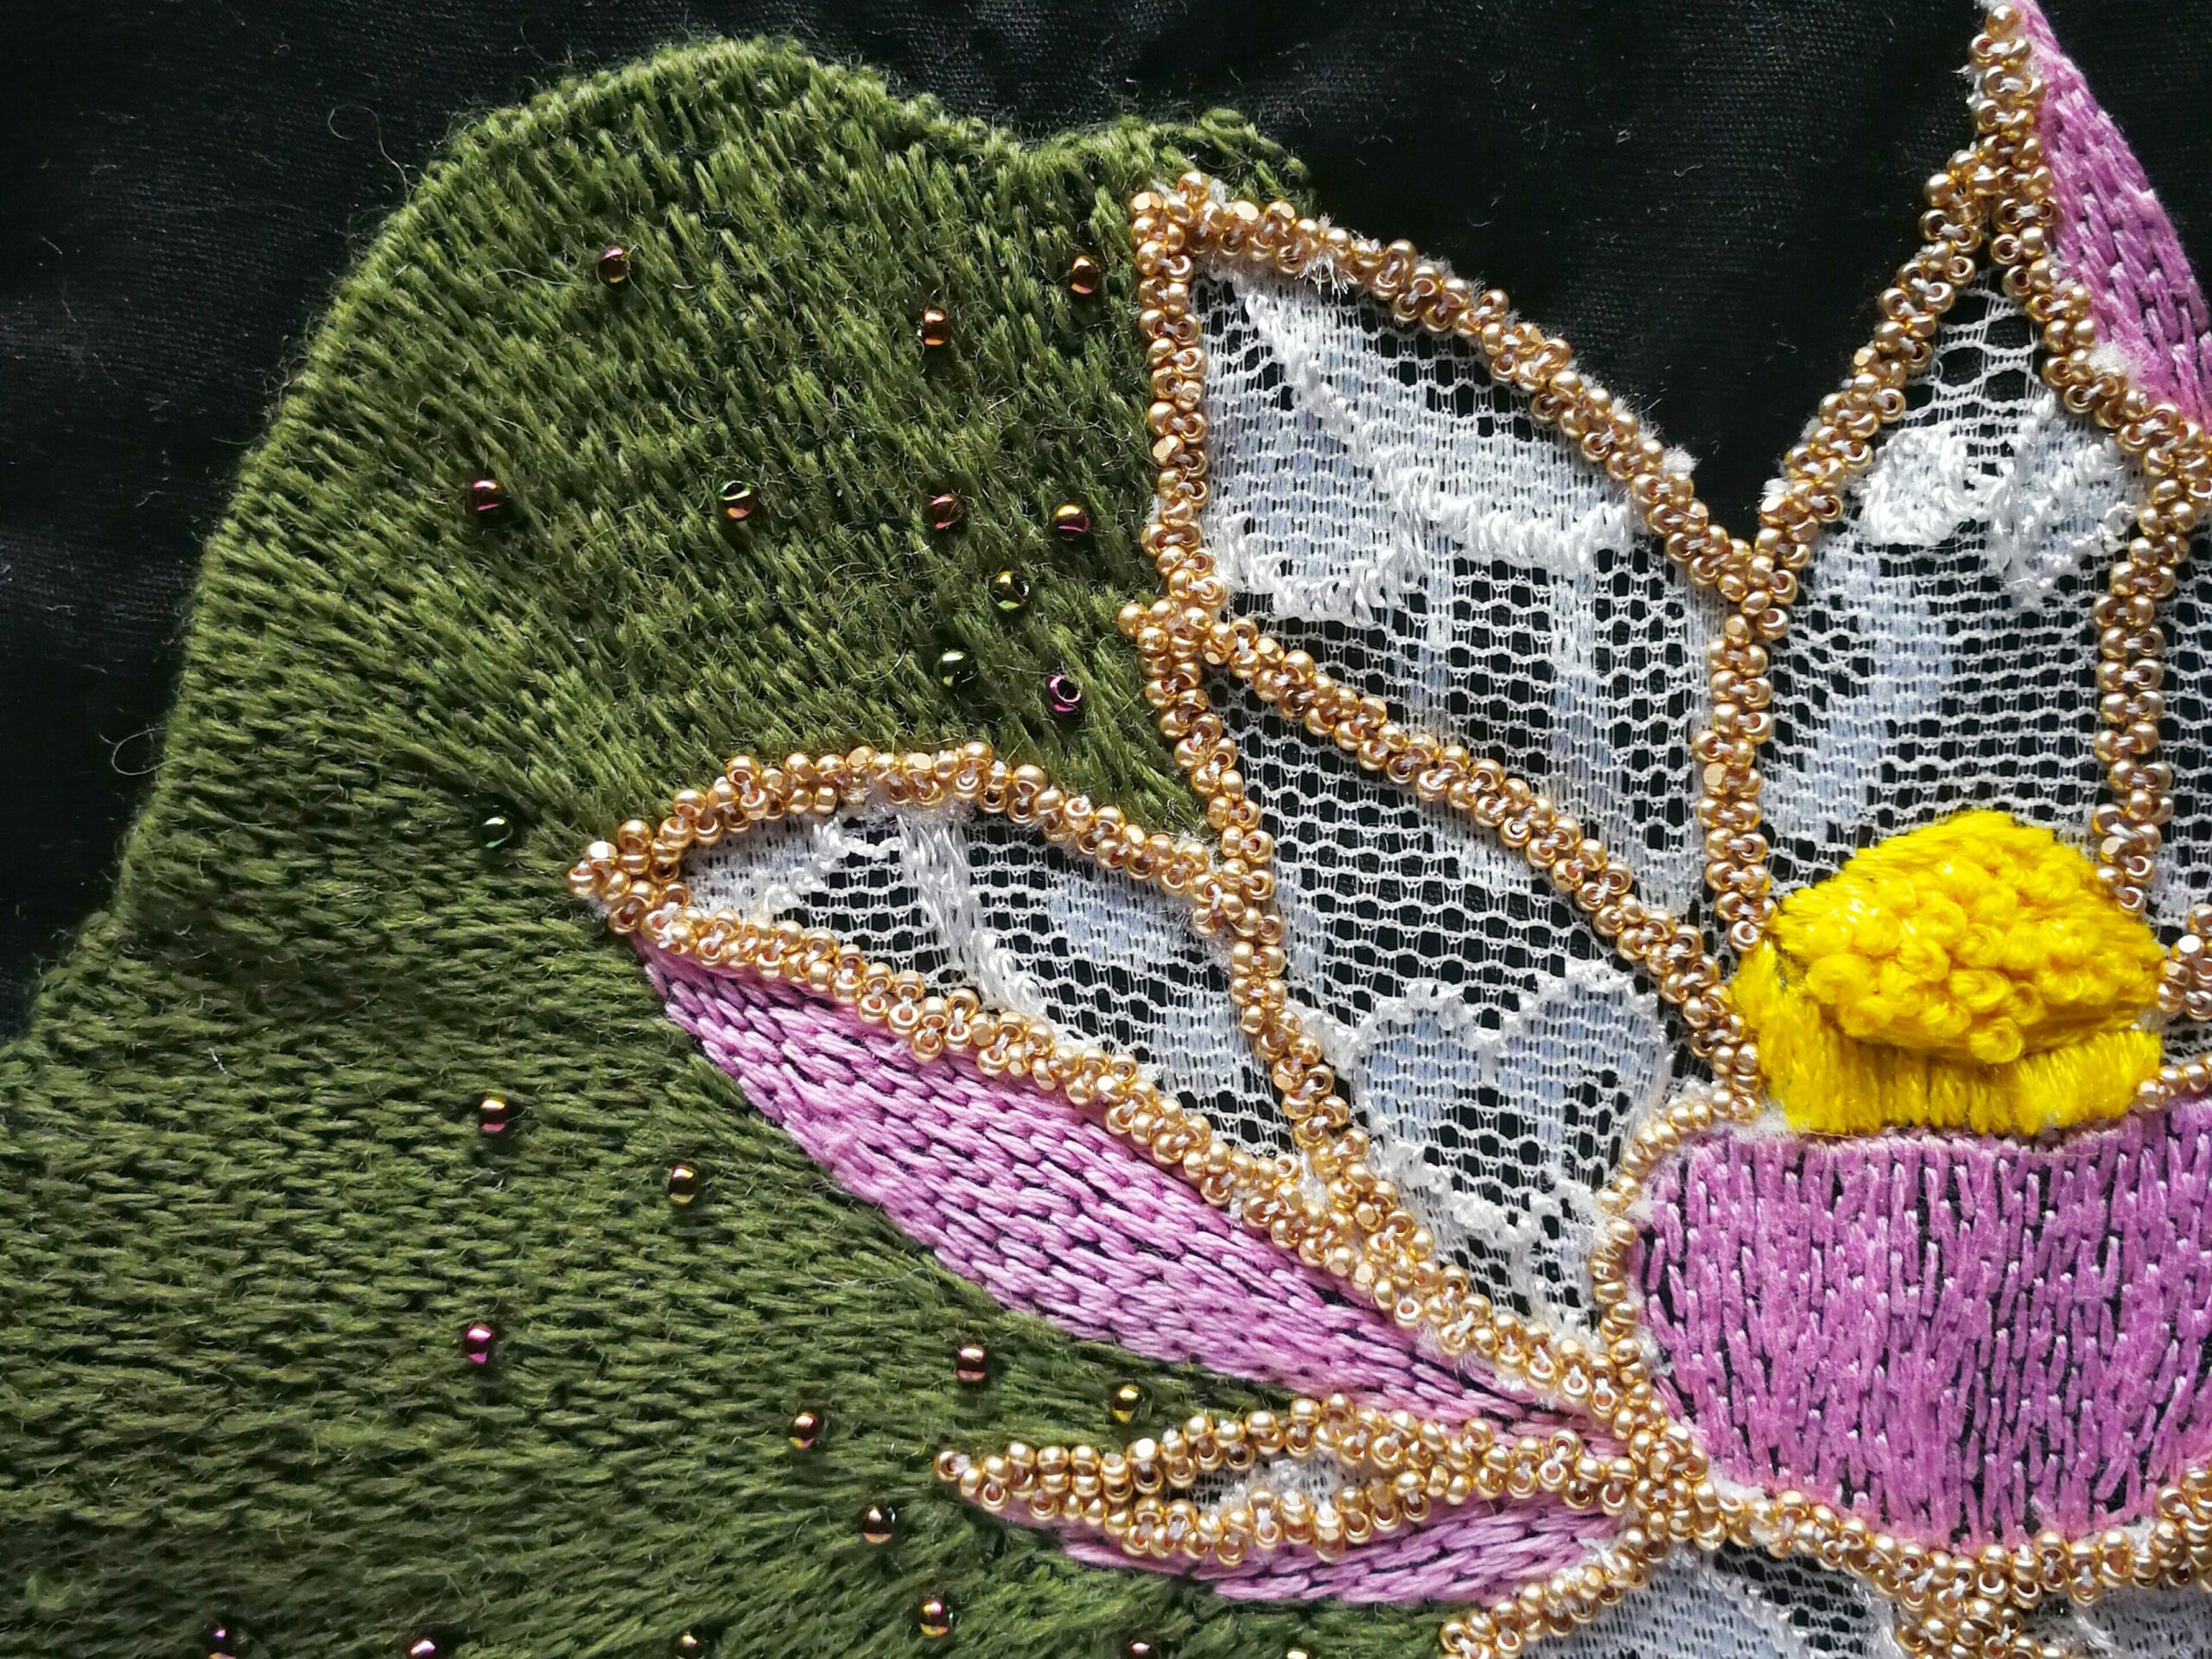
Week 6: I have added 11/0 and 15/0 beads to decorate Lotus flower petals
I have decided to decorate Lotus flower petals with 15/0 Preciosa beads. These beads are very small and look very delicate as an edge border. I am sewing them by hand and with a needle. It takes more time than I expected. When I saw I put nice music, then I listen and I sew – it is like meditation time for me. I take it slowly and enjoy the process as it progresses, bead by bead.

Week 7: Sewing of Hand Embroidery Flower Design Purse
I am a beginner when it comes to sewing, so I have used YouTube to find this lady that has very clear instructions for sewing. I followed her instructions, and everything went smoothly.
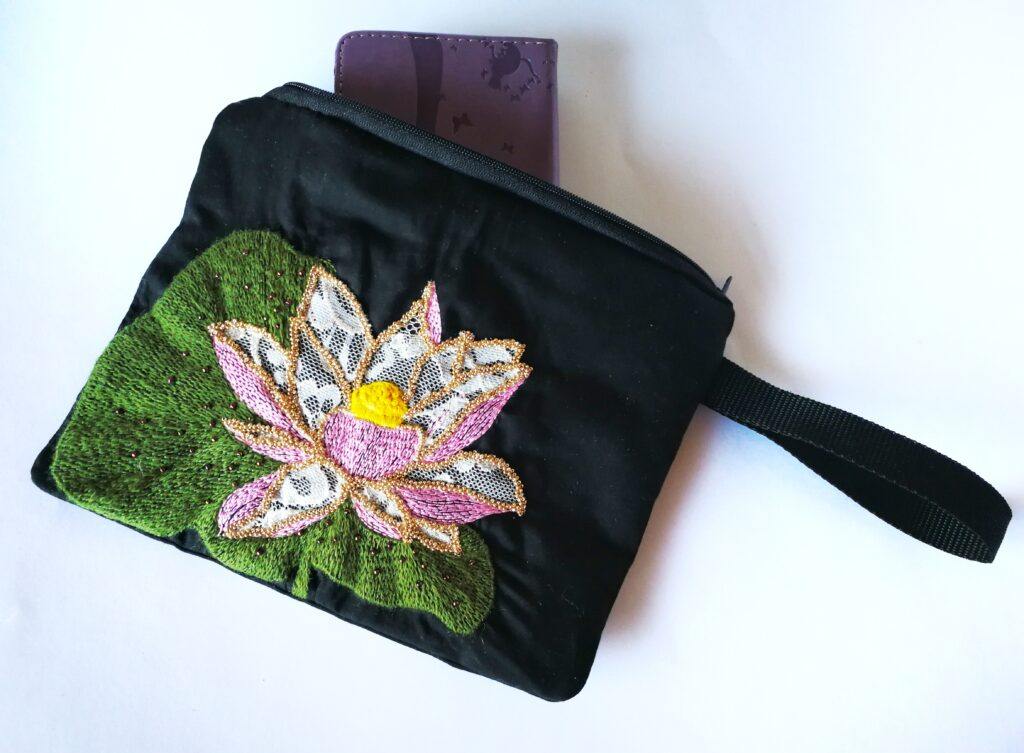
My cutest small purse is finished <3
I am so excited 🙂 I finished my first Hand Embroidery Flower Design Purse with a unique pattern – if you meet me, you will probably see me carrying it.
I hope I have answered a question on how to sew a hand embroidery Flower design Purse. I have really enjoyed writing step by step free tutorials, so more of them will be coming 🙂 I have already planned my next project.
If you have any questions about how to Sew a Hand Embroidery Flower Design Purse, please, let me know in the comments and I will be happy to reply as soon as possible 🙂
Stay safe & healthy,
Vesna
PS1: You may also find it interesting:
PS2: For more ideas Check out Craftsy’s Free Classes!
This post may contain affiliate links. Please, see my full disclosure policy for details.
Bravo for making this little beauty all for yourself. It is very special and I hope you will use it for a long time ?
It took longer than I expected, but I absolutely love it <3 I am already working on a new tutorial - that is part of the 100day project - thank you for the invitation to participate 🙂 Hope to do it next year too 🙂
Wow, this is an amazing purse with the hand embroidered flower that you made. Following the step by step instructions makes one realise that it is doable to make your own purse.
I learnt also that if you use a different amount of strands, that it will give a different texture. So 2 strands or 4 strands, instead of 6 strands, will give you a different look. Well done on your lovely purse.
Hi, Line, yes the number of strands makes a huge difference in the finished texture and look you can achieve. I will be sharing even more tips in my next tutorial 🙂
That looks amazing. I love the ook of embroidery but don’t have the patience to spend time on it. Including the videos was a great idea and very helpful.
When you got to the part with the lace I did wonder how it would be used. The result was amazing, I would not ever have thought of using it that way, the finished effect is really lovely.
Really enjoyed the post, thank you, it was interesting and informative.
thank you for stopping by Linda 🙂 and for all your kind words. I am already planning another project, hope to see you there too 🙂
Hi Vesna. When I started reading your article and saw how the flower pattern was blooming, I rushed to the end to see the final product. This is such a delightful craft!
I am bowled over by the effect of the lace on the flower. The colors are perfect. The end product is worthwhile for the hours you dedicated to it.
Thanks for sharing your project in the making with us.
Carol
thank you for reading 🙂 I am already planning my next tutorial and hope you will be back soon 🙂